1. From your Browser,
click my OpenGeeks TeamViewer Unattended link below
Your Browser may leave this page. Don't forget to come back to it for the rest of the instructions :-)
https://get.teamviewer.com/opengeeks-unattended
Your Browser may leave this page. Don't forget to come back to it for the rest of the instructions :-)
https://get.teamviewer.com/opengeeks-unattended
2. Safari, Firefox, Chrome all behave differently but ultimately you want to download and save the installer like below

3. Hopefully the downloaded file will land in your Downloads location

4. The downloaded file
with look similar to this. Click the file

5. After clicking the
file, the installer will launch. Click continue

6. Click continue after
the License Agreement

7. Review the
license if you choose, then click Agree. You do read
those right :-)

8. Click Install

9. The Installer requires Administrative Privileges. Provide the User Name and Password of this User and click Install Software

10. Yay the Installation was successful. Click close

12. Now it's time to configure TeamViewer. The Initial Setup Wizard will start. Click Continue

13. We won't be needing a Personal Password yet so choose Skip here. I'll do it later for you if you want.

14. Yay Setup if almost complete. Click finish.

15. As you want me to be able to connect anytime, you need to say OK here

16. If you are running MacOS 10.14 Mojave or 10.15 Catalina you will probably see this screen below.
If you are NOT running MacOS 10.14 Mojave or 10.15 Catalina, you will probably NOT see this screen. Please skip to Step 23
MacOS Versions like 10.14 Mojave and 10.15 Catalina require special System Access
The following Review System Access Dialog will appear

17. If you are NOT running MacOS 10.14 Mojave or 10.15 Catalina, you will probably NOT see this screen.
Please skip to Step 23 This step is for MacOS 10.14 Mojave and 10.15 Catalina only.
For Screen Recording - Click Request Access if required.
For Accessibility - Click Request Access. This opens a Accessibility Access Dialog Box like below
From there Open System Preferences

18. If you are NOT running MacOS 10.14 Mojave or 10.15 Catalina, you will probably NOT see this screen.
Please skip to Step 23 This step is for MacOS 10.14 Mojave and 10.15 Catalina only.
This is the Security & Privacy Screen
You will need to first click the gold lock on the bottom left of the screen to allow changes

19. If you are NOT running MacOS 10.14 Mojave or 10.15 Catalina, you will probably NOT see this screen.
Please skip to Step 23 This step is for MacOS 10.14 Mojave and 10.15 Catalina only.
You will be prompted to provide the User Name and Password of an Administrative user.
You are probably an Administrative User so type your name and password

20. If you are NOT running MacOS 10.14 Mojave or 10.15 Catalina, you will probably NOT see this screen.
Please skip to Step 23 This step is for MacOS 10.14 Mojave and 10.15 Catalina only.
Note Accessibility is already Selected as below
Note Privacy is highlighted as below
Ensure TeamViewer Host is checked
Click the lock button to lock it after you are done

21. If you are NOT running MacOS 10.14 Mojave or 10.15 Catalina, you will probably NOT see this screen.
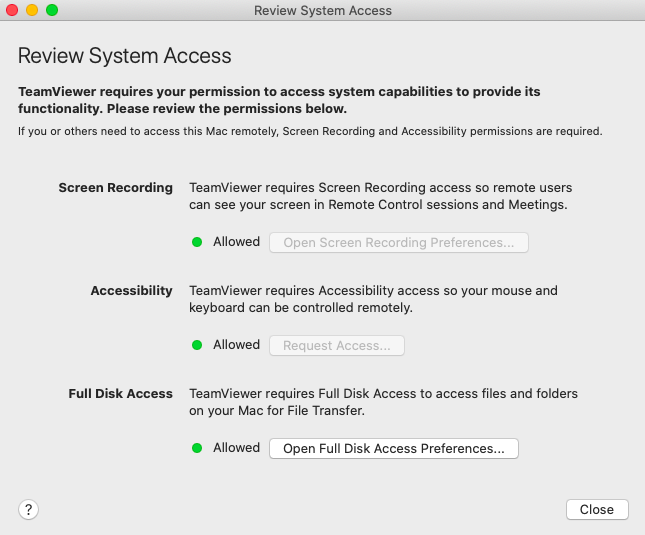
Please skip to Step 23 This step is for MacOS 10.14 Mojave and 10.15 Catalina only.
Review System Access should now have Allowed for all 3 items
Adjust if necessary
22. If you are NOT running MacOS 10.14 Mojave or 10.15 Catalina, you will probably NOT see this screen.
Please skip to Step 23 This step is for MacOS 10.14 Mojave and 10.15 Catalina only.
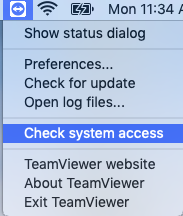
Review System Access should is easy to launch any time.
From the TeamViewer Icon, Select Check System Access
23. We are almost done. Click the TeamViewer icon in the top right of your screen. Select Preferences

24. Select Security. Now check Grant Steve Quinn easy access.
With this checked, I will be able to connect any time you need my help

25. You may in the future have a person requesting to use TeamViewer for other purposes
This is fine. They cannot use my password of course but they can connect the traditional way
Simply go to the TeamViewer Icon at the top right of your screen and select Show Status Dialog

26. This is the Show Status Dialog
Your ID and Password is what you give them
The ones in the picture below are examples, yours will be different

27. One last thing. After I or you disconnect the TeamViewer session you may see this screen
Don't worry, nothing is wrong. Just let it time out or simply select Generate new.

28. Have fun
9. The Installer requires Administrative Privileges. Provide the User Name and Password of this User and click Install Software
10. Yay the Installation was successful. Click close
12. Now it's time to configure TeamViewer. The Initial Setup Wizard will start. Click Continue
13. We won't be needing a Personal Password yet so choose Skip here. I'll do it later for you if you want.
14. Yay Setup if almost complete. Click finish.
15. As you want me to be able to connect anytime, you need to say OK here
16. If you are running MacOS 10.14 Mojave or 10.15 Catalina you will probably see this screen below.
If you are NOT running MacOS 10.14 Mojave or 10.15 Catalina, you will probably NOT see this screen. Please skip to Step 23
MacOS Versions like 10.14 Mojave and 10.15 Catalina require special System Access
The following Review System Access Dialog will appear
17. If you are NOT running MacOS 10.14 Mojave or 10.15 Catalina, you will probably NOT see this screen.
Please skip to Step 23 This step is for MacOS 10.14 Mojave and 10.15 Catalina only.
For Screen Recording - Click Request Access if required.
For Accessibility - Click Request Access. This opens a Accessibility Access Dialog Box like below
From there Open System Preferences
18. If you are NOT running MacOS 10.14 Mojave or 10.15 Catalina, you will probably NOT see this screen.
Please skip to Step 23 This step is for MacOS 10.14 Mojave and 10.15 Catalina only.
This is the Security & Privacy Screen
You will need to first click the gold lock on the bottom left of the screen to allow changes
19. If you are NOT running MacOS 10.14 Mojave or 10.15 Catalina, you will probably NOT see this screen.
Please skip to Step 23 This step is for MacOS 10.14 Mojave and 10.15 Catalina only.
You will be prompted to provide the User Name and Password of an Administrative user.
You are probably an Administrative User so type your name and password
20. If you are NOT running MacOS 10.14 Mojave or 10.15 Catalina, you will probably NOT see this screen.
Please skip to Step 23 This step is for MacOS 10.14 Mojave and 10.15 Catalina only.
Note Accessibility is already Selected as below
Note Privacy is highlighted as below
Ensure TeamViewer Host is checked
Click the lock button to lock it after you are done
21. If you are NOT running MacOS 10.14 Mojave or 10.15 Catalina, you will probably NOT see this screen.
Please skip to Step 23 This step is for MacOS 10.14 Mojave and 10.15 Catalina only.
Review System Access should now have Allowed for all 3 items
Adjust if necessary
22. If you are NOT running MacOS 10.14 Mojave or 10.15 Catalina, you will probably NOT see this screen.
Please skip to Step 23 This step is for MacOS 10.14 Mojave and 10.15 Catalina only.
Review System Access should is easy to launch any time.
From the TeamViewer Icon, Select Check System Access
23. We are almost done. Click the TeamViewer icon in the top right of your screen. Select Preferences
24. Select Security. Now check Grant Steve Quinn easy access.
With this checked, I will be able to connect any time you need my help
25. You may in the future have a person requesting to use TeamViewer for other purposes
This is fine. They cannot use my password of course but they can connect the traditional way
Simply go to the TeamViewer Icon at the top right of your screen and select Show Status Dialog
26. This is the Show Status Dialog
Your ID and Password is what you give them
The ones in the picture below are examples, yours will be different
27. One last thing. After I or you disconnect the TeamViewer session you may see this screen
Don't worry, nothing is wrong. Just let it time out or simply select Generate new.
28. Have fun